How to Customize WooCommerce Checkout Fields (No Code Required)

Share this content
Copy Link
Share



Design WooCommerce Stores That Convert
-
100+ Widgets
-
15+ Modules
-
150+ Templates
-
At Your Service
Follow us on:


Let’s start with one question: how many fields should a WooCommerce checkout actually have?
Baymard Institute’s 2024 research puts the average checkout flow at 11.3 form fields, while most stores need only about 8. Every extra field is a small tax on your conversion rate, and every missing field is a support ticket or a shipping mistake waiting to happen.
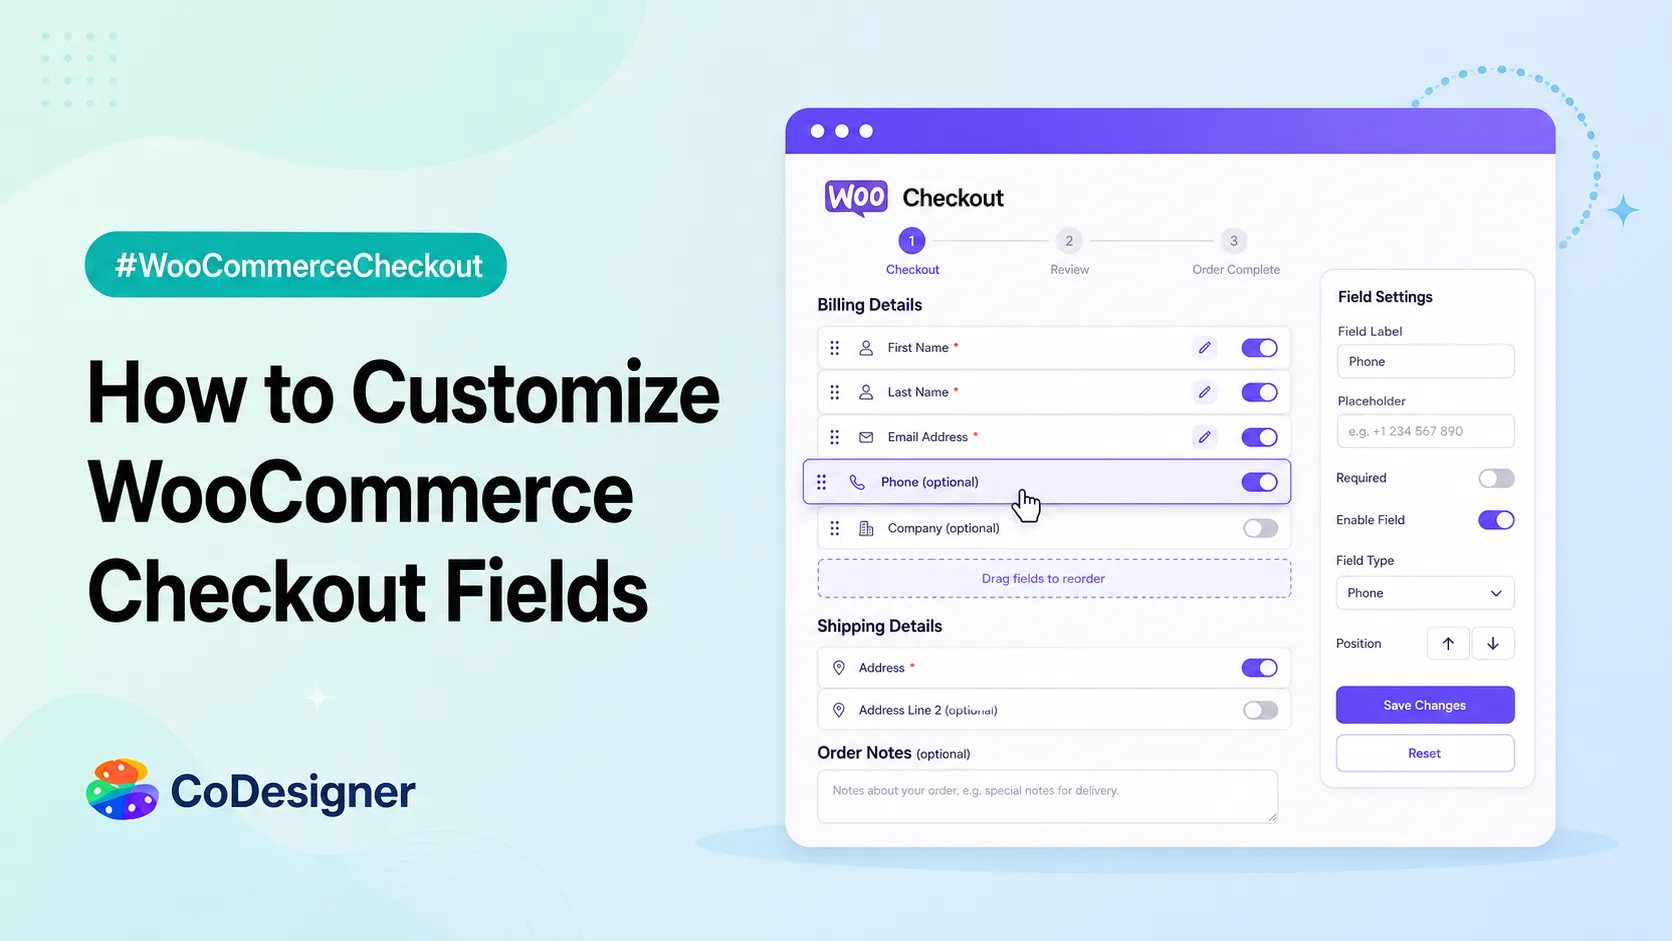
You don’t need a developer to fix either problem. This guide walks through exactly how to add, arrange, and remove checkout fields on your WooCommerce store; which field types are available; where custom fields appear after checkout; and which fields are actually worth adding.
Quick Reference
Use this quick reference to find the right no-code option for each checkout customization task.
| What You Want to Do | Where It Happens | No-Code Method |
|---|---|---|
| Hide or make a default field optional (Company, Address Line 2, Phone) | Classic checkout defaults | WooCommerce Customizer |
| Add a brand-new field (text, date, select, etc.) | Billing, Shipping, or Order Notes section | CoDesigner field editor (Elementor widget) |
| Arrange field order and width (half or full row) | Any custom field | Field list order + class name setting |
| Show a field in order emails | New order, processing, completed emails | “Show in Email” control |
| Show a field on the order edit screen | WooCommerce admin | “Show on Order Edit Page” control |
Why Customize Your WooCommerce Checkout Fields
Customizing checkout fields helps you remove unnecessary steps, collect only useful information, and create a smoother buying experience.
The Cost of a Bloated Checkout Form
Cart abandonment across ecommerce sits around 70%, and checkout complexity is one of the few causes a store owner can actually fix without a marketing budget. Baymard’s benchmark found the average checkout carries 11.3 form fields, while a well-designed flow can get by with about 8.
Every unnecessary field adds typing, adds a chance for an error, and gives a hesitant buyer one more reason to close the tab. Field count is only one part of the picture though; if you want the fuller list, see this piece on checkout conversion tactics.
The default WooCommerce checkout already asks for more than most stores need. Company name, a second address line, and a phone number are collected by default even though plenty of stores never use them.
Common Reasons Store Owners Add or Remove Fields
Most requests fall into a handful of buckets:
- Removing fields that don’t apply (company name for a B2C store, a second address line for digital products)
- Collecting order-specific information (gift message, delivery date, engraving text)
- Meeting compliance needs (a terms checkbox, a GDPR consent field, a tax ID for B2B orders)
- Matching a brand’s tone with custom labels and placeholder text
What You Can Customize on the WooCommerce Checkout Page
WooCommerce gives you basic control over default checkout fields, while a checkout field builder lets you go further with custom fields, layouts, and options.
Default Fields You Can Edit or Hide
WooCommerce ships with a native way to trim the built-in fields.
Go to Appearance, then Customize, then WooCommerce, then Checkout, and you’ll find toggles for the Company Name, Address Line 2, and Phone fields.
Each one can be set to required, optional, or hidden. Setting these three to optional or hidden is one of the simplest steps toward leaner, more GDPR-friendly data collection, and it takes about two minutes.
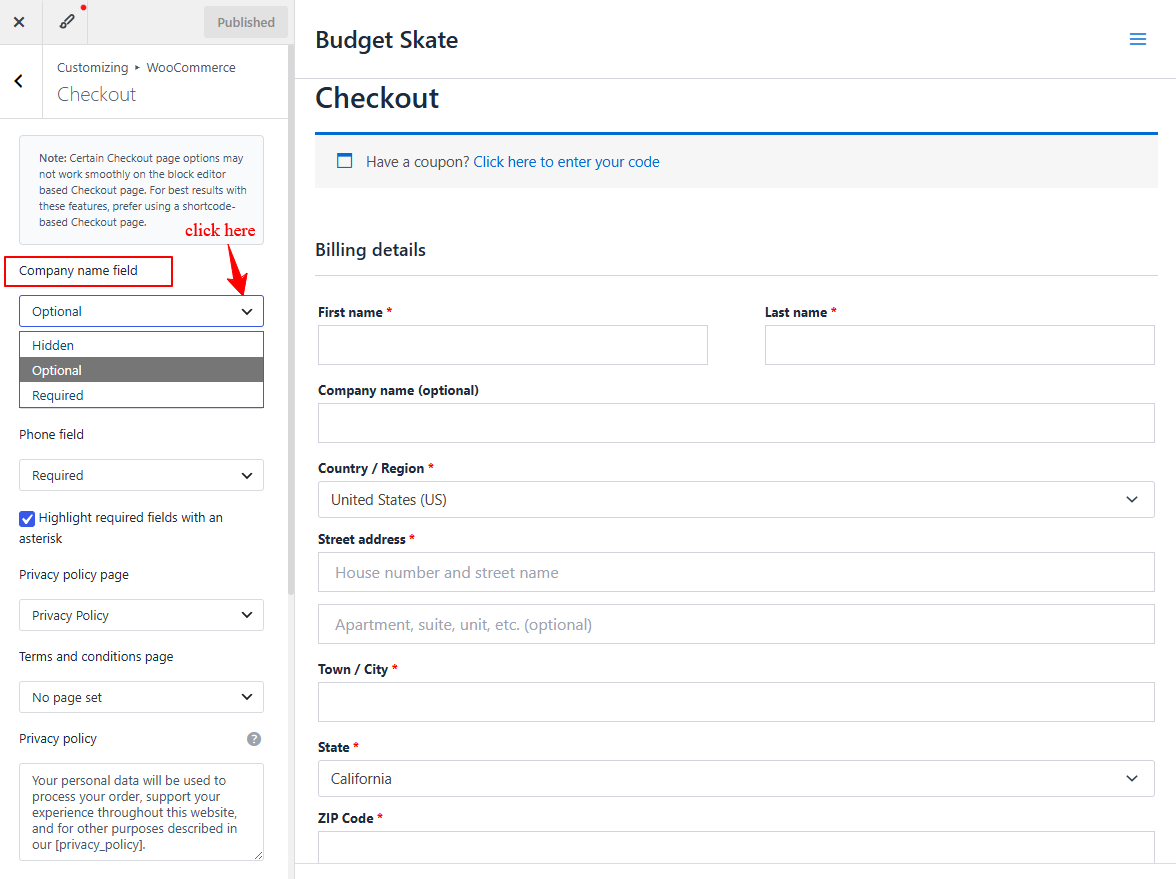
One caveat: these Customizer toggles apply to the classic (shortcode) checkout, which is what CoDesigner builds on. If your store runs the newer block-based checkout, the controls live in a different place.
This native option covers the built-in fields, but it stops there. You can’t rename a label beyond what’s offered, you can’t change a field’s type, and you definitely can’t add a brand-new field for gift notes or delivery dates. For that, you need a proper field builder.
Custom Field Types You Can Add
A proper checkout field builder gives you more than a plain text box. Standard field types worth knowing:
- Text – short open answers like a company name or reference number
- Textarea – longer notes, such as delivery instructions
- Select and Radio – fixed choices, useful for delivery windows or gift wrap options
- Checkbox – consent boxes, opt-ins, or yes/no toggles
- Date – delivery dates, event dates, birthdays
- Number, Email, Tel, URL – validated input for specific data types
- Password – rarely needed at checkout, but available for account-related flows
Each field type changes the input shown to the shopper, and picking the right one cuts down on bad data. A delivery date typed into a plain text field turns into a support headache. A date picker doesn’t.
The same logic applies to select and radio fields: locking a shopper into predefined choices means you never have to decode a handwritten answer like “sometime next week” during fulfillment.
Beyond the input type, most field builders also let you set an autocomplete value. That’s the hint browsers use to fill in known data, and it’s worth setting correctly on standard fields like name, email, and address so returning customers see fewer blank boxes.
How to Customize Checkout Fields With CoDesigner
CoDesigner adds a field editor directly into Elementor, so you can build and style checkout fields on the same canvas you’re already designing on, no leaving the editor, no code. Here’s the full walkthrough, using a delivery date field as the working example.
Before You Start
Make sure these four are installed and active:
- Elementor
- WooCommerce
- CoDesigner (free version)
- CoDesigner Pro
Set Up Your Checkout Page
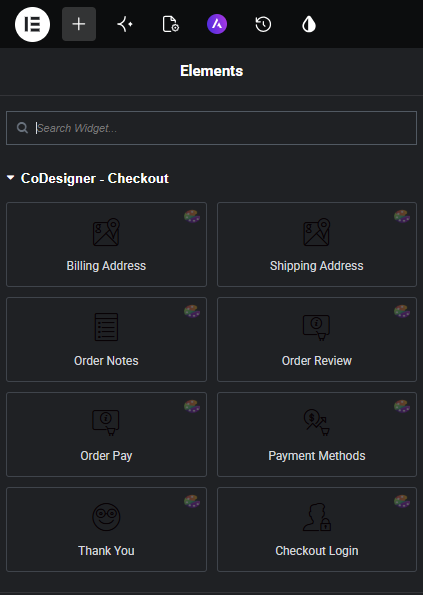
Turn on the checkout widgets from the CoDesigner dashboard and save the changes.
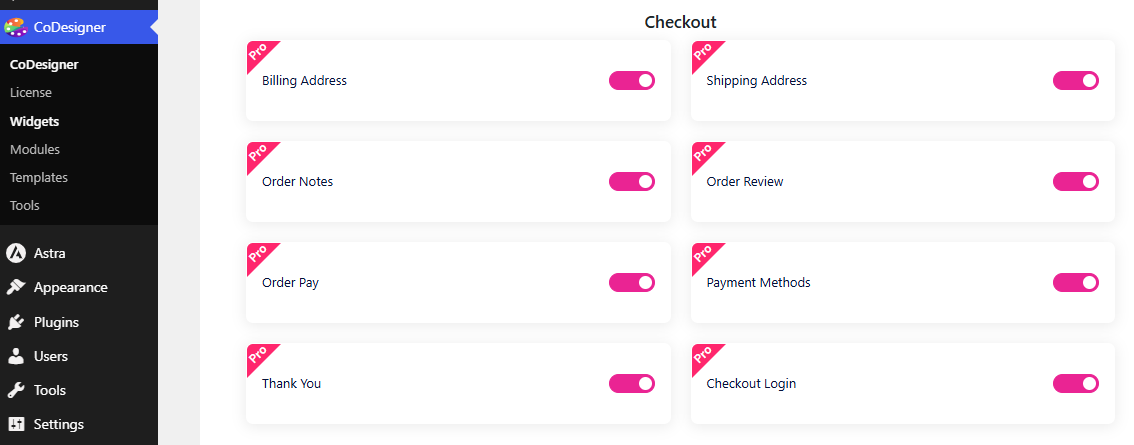
Create a new page for checkout and edit it with Elementor, or delete the WooCommerce shortcode from your existing checkout page and build directly on it.
Add the widgets you need. A typical setup includes Billing, Shipping, Order Notes, Order Review, and Payment Methods, though CoDesigner also offers Order Pay, Checkout Login, and Thank You widgets for the rest of the flow.
Add the Custom Field
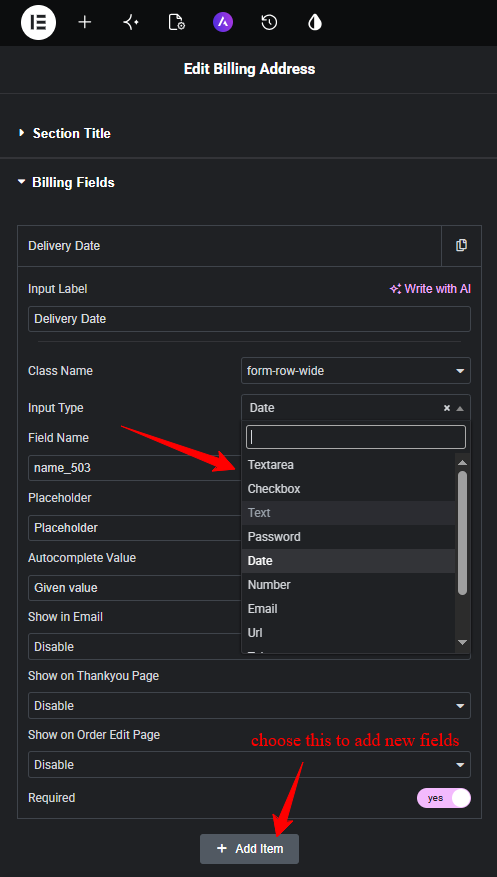
The Billing, Shipping, and Order Notes widgets are the ones with a field editor. For a delivery date field, Order Notes is a natural home, though the same steps apply on Billing or Shipping if the field belongs there instead.
- Open the widget and find its field list.
- Add a new row.
- Set the Input Label to “Delivery Date” for this example.
- Set the Input Type to Date. Other options include Text, Textarea, Checkbox, Password, Number, Email, Url, Tel, Select, and Radio, depending on what you’re collecting.
- Fill in Field Name, Class Name (half or full-width row), Placeholder, and Autocomplete Value.
- Toggle Required on if the order can’t be fulfilled without it.
Arrange Order and Width
Fields display in the order they sit in the widget’s field list, so move a row up or down in the list to change where it appears on the page. Use the Class Name setting to make a field span a half row or a full row, which lets you pair short fields side by side instead of stacking everything into one long column.
Decide Where the Answer Shows Up
Adding a field doesn’t automatically put the shopper’s answer anywhere useful. Set these per field:
- Show in Email: choose in order details, before the order table, after the order table, in order meta, or in customer details. Leave it disabled if you don’t need it in emails.
- Show on Thank You Page: before the Thank You message, after or at the bottom of it, or disabled.
- Show on Order Edit Page: after order details, after the billing address, after the shipping address, in the order items header, after shipping totals, before order actions, or after order actions, or disabled.
For a delivery date field, turning all three on means the customer sees a confirmation on the thank-you page and in their order email, and your fulfillment team sees it right on the order screen in WP-Admin.
Style and Publish
Below the field list, typography, color, background, border, border radius, and padding controls let you match the new field to the rest of your checkout. Update the page, then check the front end. The field now shows up exactly where you placed it, and every submission flows through to wherever you told it to appear.
Building all of this on the Elementor canvas is the point: design your entire WooCommerce checkout with CoDesigner Pro and skip the code and the copy-paste snippets.
Popular Use Cases for Custom Checkout Fields
- Gift message: A textarea field, shown on the packing slip via the order edit page, lets shoppers add a note without emailing support.
- Preferred delivery date: Shown above with Order Notes and a Date field type, this works well for florists, bakeries, and local delivery stores. Pair it with a required toggle if the order can’t be scheduled without it.
- VAT or tax ID: A text field with validation-friendly formatting, visible on the order admin screen for accounting.
- GDPR or marketing consent: A checkbox field, unchecked by default, with plain language explaining what the shopper is agreeing to. Only collect what you’ll actually use, and keep it optional unless it’s required for the order itself.
- Age verification: A checkbox or select field for stores selling age-restricted products, often paired with a required toggle.
- Special instructions for local pickup: A select field listing pickup windows works better than a free-text box, since it keeps answers within what your team can actually schedule.
- Order references for B2B buyers: A text field for a purchase order number, shown on the order edit page so accounting can match invoices without a separate email thread.
Some of these fields also open the door to upselling and cross-selling at the point of purchase. A gift-wrap checkbox that adds a small fee, or a delivery-date field that surfaces a rush-shipping option, turns a plain form field into extra order value.
If your store needs fields that appear only in certain situations (a gift message that shows only when ‘This is a gift’ is ticked) or fields that adjust the order total, confirm that conditional display and fee logic are supported before you promise them to customers, since not every field builder handles them.
None of the standard fields needs to be complicated. The pattern that works across all of them is the same: pick the narrowest field type the answer fits, decide upfront whether it’s required, and confirm where the answer needs to show up after the order is placed.
Checkout Field Best Practices to Protect Conversions
A well-optimized checkout collects only the information you need while keeping the form simple and easy to complete. Use these best practices to reduce friction and protect conversions:
- Default to fewer fields, not more: Baymard’s research consistently shows completion rates drop as the field count climbs past the 8-field mark. Before adding any field, ask whether the order can be fulfilled without it, and save the required toggle for information that genuinely blocks fulfillment.
- Match field width to content: Short answers like a postal code or a two-choice radio group don’t need a full-width row. Pairing short fields side by side keeps the form visually shorter, which matters more on mobile than most store owners expect.
- Be deliberate with data collection: Every custom field is a piece of customer data you’re now responsible for. Hide or make optional anything you don’t strictly need, particularly for stores serving EU customers.
- Test on mobile first: Mobile shoppers abandon carts at a noticeably higher rate than desktop shoppers, and a checkout form that looks fine on a laptop can feel long on a phone screen. A shorter form matters even more if you’re considering a one-page checkout layout, where every field fits on a single page instead of spreading across steps.
- Audit fields after a redesign, not before: The fields people actually miss only show up once real orders start coming in and support tickets reveal what customers were trying to tell you. Add fields based on real gaps, not guesses.
- Don’t duplicate data WooCommerce already collects: A second “email” or “phone” field, added out of habit from a template, just confuses the checkout and creates two places for the same value to go stale.
Final Thoughts
A shorter, better-organized checkout form is one of the few conversion fixes that doesn’t require more traffic or a bigger budget.
Start by trimming what you don’t need, add only the custom fields your fulfillment process actually depends on, and confirm each one actually reaches your emails and order admin screen. Review your checkout fields every few months. Shopping habits shift, and a field that made sense a year ago might just be friction today.
A clean checkout is also a good starting point if you’re working on customer retention strategies, since the data you collect here often feeds directly into how you follow up after the sale.
When you’re ready to build it, CoDesigner lets you design and customize every checkout field inside Elementor, visually and without code.
Frequently Asked Questions (FAQs)
Can You Customize WooCommerce Checkout Fields Without Code?
Yes. You can hide or make some default fields optional with the WooCommerce Customizer, while a checkout builder like CoDesigner lets you add and style custom fields without coding.
How Many Checkout Fields Should a WooCommerce Store Have?
There’s no fixed number, but Baymard’s research points to around 8 as a healthy target versus the 11.3 average. Keep only the fields needed to complete and fulfill the order. Fewer fields usually mean a simpler checkout.
Can Custom Checkout Fields Appear in Order Emails?
Yes. If your checkout field builder supports it, you can display custom field values in order emails, the thank-you page, and the admin order screen. CoDesigner exposes all three as per-field toggles.
Is It Safe to Remove Default WooCommerce Checkout Fields?
Usually, yes. You can remove unnecessary fields, but avoid removing fields required for shipping, tax, or order processing.
Do Custom Checkout Fields Slow Down My Site?
Not usually. A few lightweight fields have minimal impact. Performance issues are more likely when multiple plugins load unnecessary scripts on the checkout page.